Tag Archives: ARD

A practical example of using the ARD ruby gem

Here’s a practical example of using the ARD ruby gem to help organize your Apple Remote Desktop Commands.

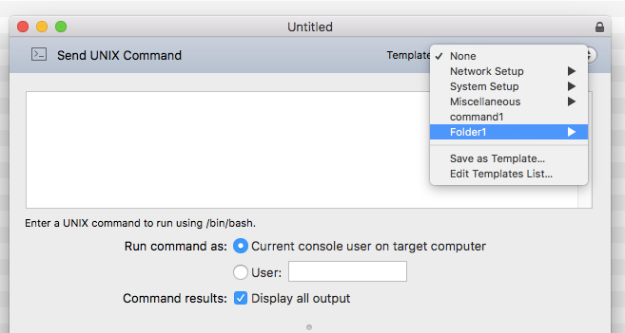
Let’s say you already have one saved command, named “command1”.

ard-gem-01.png

existing saved command

But you want to move “command1” into a folder named “Folder1”.


Create a new folder

Let’s create the folder by using the ARD gem, with this command:

#usage
ARD.create_empty_folder("Name of new folder")

ard-gem-04.png

ard-gem-02.png

the results of running the above command


Move a command into a folder

Now lets move “command1” inside “Folder1” with this command:

 #usage
 ARD.move_command("Name of command to move", "Name of folder to move to")
 

ard-gem-05.png

ard-gem-03.png

results of running the above command

“command1” is now inside the folder. You can run this command as many times as you want just replacing the name of the command, until you have everything you want moved into a specific folder. For example .. a folder named “Printer Commands” that has four commands that help you administrate printers.

Best practice is to make sure Apple Remote Desktop is closed while running the commands, then open afterwards to see results. If the “Send Unix Command” window is open in Apple Remote Desktop, you may receive an error while running the command.

ARD gem on Github or Ruby Gems

Organizing Commands In Apple Remote Desktop With The Help Of Ruby

My last post was about manually creating and organizing commands in Apple Remote Desktop with the help of Xcode to edit a plist file.

This post is about using Ruby to do the heavy and ugly lifting of editing the nested UnixCommandTask.plist  file. If you’ve ever saved a command the file exist. If it’s not there, click on the “Unix” tab in ARD and save a test command so the file is automatically created. You can find the file at:

 ~/Library/Containers/com.apple.RemoteDesktop/Data/Library/Application Support/Remote Desktop/Presets/UnixCommandTask.plist

There’s a couple of scripts on my github that help to make the process easier and I hope to cover the overview and basic usage here.

ARDplist.rb is the main file that contains the class and methods, and ARDplist_usage.rb contains examples. You can uncomment commands in “ARDplist_usage.rb” and run them, or create another file for your commands and require ARDplist, see the ReadMe file.


Create A New Folder And Command:

Creating a new foler or command is the most tedious part. There’s a syntax that has to be followed.

Example Code:

#sets a folder named "Admin Commands", with a command named "list of users"
newcommand = ARD::Command.new(
  "Admin Commands",#folder name
  "list of users", #command name
  true, #see output in ARD after command runs
  "ls -1 /Users/",#command to run
  "root", # user to run command as
  1) #select user to run command as radio button, must be set to 1 if you want to run as another user

#executes the above information to actually create the folder and command
ARD.create_command(newcommand)

This creates the example below:Screen Shot 2017-05-17 at 3.23.18 PM.png

If you want to add a command to that folder, run the code again but make sure the folder name is the same.

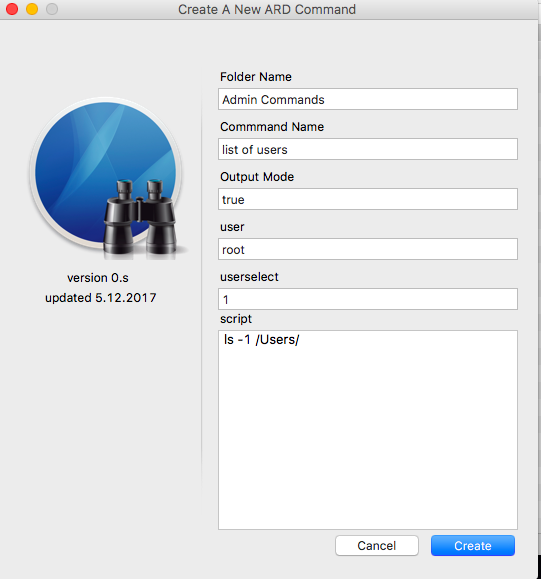
This isn’t too bad if you’re creating a simple command like “ls” but gets a little unsightly if you want to add 6 lines of code. So for the folder and command creation part, I also made a little app with Pashua to give the user a gui. The example code below will make the exact same folder and command as the code example above. The advantage here is you can just paste your code into the “script” field as is, line breaks and all.

ard_13.png


Listing Options:

Once you have folders and commands you can manage and organize them with by using the “ARDplist.rb” file. Just require it in your ruby file and use the command below to see options.

#if ARDplist.rb was in the same directory as your file
#otherwise change the path after require to where ARDplist is
require './ARDplist'
#list of options for use
puts ARD.options

The output will look like this:

- create_command
- create_folder
- create_spacer
- delete_command
- delete_folder
- folder_index
- list_folders
- move_folder
- options
- rename_command
- rename_folder


Moving, Renaming, and Deleting:

I’ll cover some quick and basic examples of the options above.


list_folders:

If this is your commands, you can run “ARD.list_folders” to return existing folders and single commands. Beware that the first 4 folders are Apples and do not report back.

ard_1.png
puts ARD.list_folders
#output is a list of folders or single commands that exist
ls
folder1
folder2

folder_index:

Tells you what physical position a folder is in, remember that the first 4 folders don’t count. From the screenshot above, you can see that “folder1” is in the second spot, which in programming language is 1, since counting starts at 0.

puts ARD.folder_index("folder1")

#output below
1


move_folder:

If you want to move “folder1” to position 0

ard_2.png

#move position of existing folder. arguments are (original_position, new_position)
ARD.move_folder(1, 0)


create_spacer:

Create a visual line break to separate commands.

ard_6.png

#creates a visual space by using ---------------
#argument is the physical location you want the spacer
ARD.create_spacer(1)


rename_folder:

If you want to rename a folder .. example change “folder1” to “folder0”

ard_4.png

#rename an existing folder. arguments are (oldname, newname)
ARD.rename_folder("folder1", "folder0")


rename_command:

Rename a command inside a folder. Example, change “command1” to “command2”

Screen Shot 2017-05-17 at 4.04.05 PM.png

Before

Screen Shot 2017-05-17 at 4.35.46 PM.png

After

#Rename a command, arguments are ("folder_name", "orignialcommandname", "newcommandname")
ARD.rename_command("folder1", "command1", "command2")


delete_command:

To delete a command inside a folder.

Screen Shot 2017-05-17 at 4.37.51 PM.png

#Delete a command, arguments ("folder_name", "command_name")
ARD.delete_command("folder1", "command2")


delete_folder:

To delete an entire folder. This is the same as using the build in “Edit Templates List” and removing a command in ARD.

Screen Shot 2017-05-17 at 4.44.21 PM.png

#delete an existing folder, arguments are ("foldername")
ARD.delete_folder("folder1")

Organizing Unix Commands In Apple Remote Desktop

ARD_icon_3.png

Apple Remote Desktop (ARD) has always had a cool feature to run Unix commands on client machines. If you want to save those commands you have the option to create a “Template”.

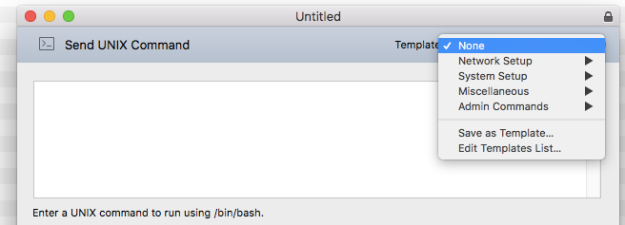
This can be a huge time saver. When you first open ARD and click on the “Unix” button, then click on the “Templates” drop down menu in the upper right. You get the out-of-box, neat and clean, defaults. Nicely organized for you.

000

ARD defaults

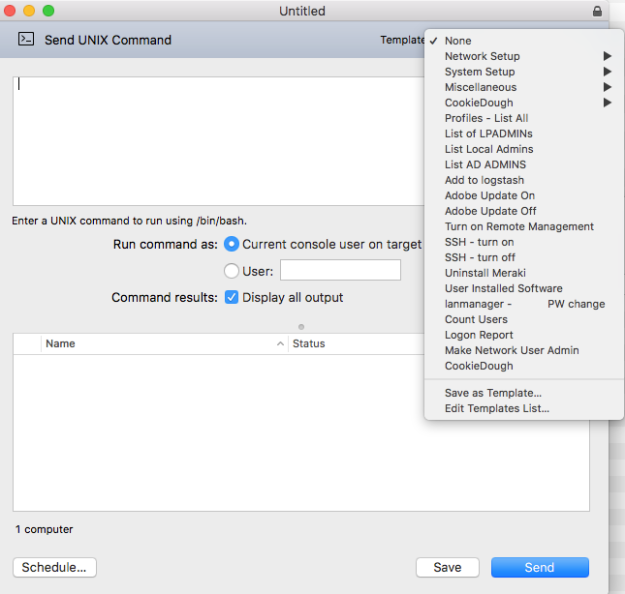
But after time .. things can get unruly. It can look like this, or worse depending on how many commands you have saved.
001.png

unorganized list of commands

It would be nice if Apple provided a built-in way to create folders and organize commands. What’s that, an update to ARD that adds features … I know … crazy talk.

But you can edit the plist manually, create your own folders, and organize as you wish. So you end up with something a bit cleaner.

002.png

organized commands with custom folders


Starting With A Clean UnixCommandTask.plist

You can find the plist that holds the commands at:

"/Users/(username)/Library/Containers/com.apple.RemoteDesktop/Data/Library/Application Support/Remote Desktop/Presets"

Assuming you have ARD installed and use it. If you don’t have that file it means you haven’t saved any commands as a template. No worries, we’ll create the file.

I’m going to start with a clean “UnixCommandTask.plist” by renaming my original, “-old”. This way I preserve my already saved commands and if something goes wrong, I have a backup.

To create the plist, open ARD and click on the “Unix” command button. Type anything in the command field. Click the “User” button and add “root”, then click on “Template”. Choose “Save as Template” and when the name field pops up, type “test”.
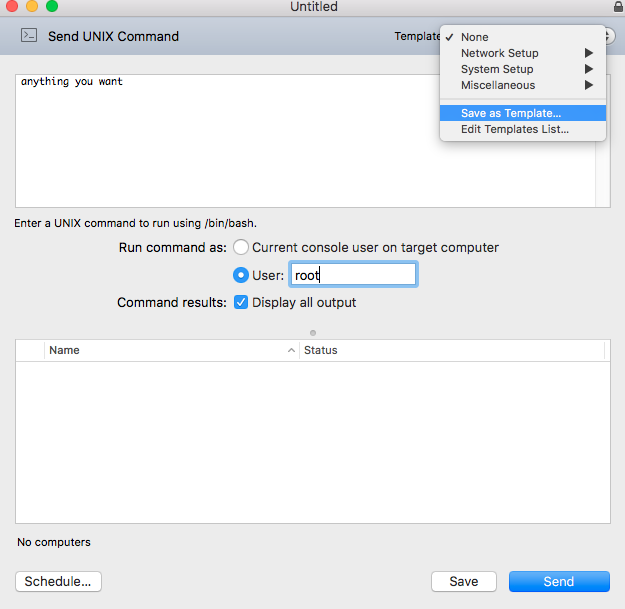
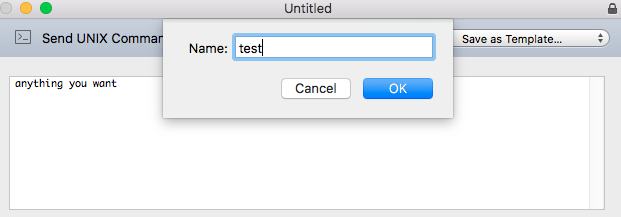
Screen Shot 2017-03-13 at 9.47.22 AM.png

Screen Shot 2017-03-13 at 9.47.32 AM.png

Now you should have a new “UnixCommandTask.plist” in your “Presets” folder.

Screen Shot 2017-03-13 at 11.15.13 AM.pngOpen it in Xcode and it should look like this:

Screen Shot 2017-03-13 at 10.31.51 AM.png

You can do this with a text editor … it’s just XML, but because the structure is nested, it’s a bitter easier and cleaner to visualize in Xcode.

Click the triangle next to “Item 0”, which is just a dictionary, to expand and you’ll see two keys, “name” and “state”.

Screen Shot 2017-03-13 at 10.32.56 AM.png

Next to “name” you can see it’s a “string” named … “test”. The name we gave our test command. Open “state” and you’ll see the attributes that go with the command.

outputMode = (this is the checkbox "Command Results: Display all output")
script = (the actually field you enter the command)
user = (if you run commands as root you want to make sure this is set)
userSelect = (must be set to 1, with the above user key set to root. If it's 0 it defaults to current console user)
Screen Shot 2017-03-13 at 10.33.40 AM.png

If you don’t have all 4 fields inside state, you can click the + button to the right of state and manually create them


Creating a Folder

Now that you can see the structure, how do we create our own folder?

We make a simple change. Go back and select “Item 0” and copy it (command + c), and change the “name” key from “test” to “test folder”.

Screen Shot 2017-03-13 at 10.41.46 AM.png

Now delete the 4 items inside the “state” key and change “state” from “Dictionary” to “Array”.

Screen Shot 2017-03-13 at 10.43.24 AM.png

With the “state” key selected, paste (command + v) the original “Item 0” into “state”.

Screen Shot 2017-03-13 at 10.45.28 AM.png

Expand “Item 0” and you’ll see the original structure for our test command.

Screen Shot 2017-03-13 at 10.46.32 AM.png


Open ARD and you should now see a new folder named “test folder”, with a command named “test”.

Screen Shot 2017-03-13 at 10.47.16 AM.png

Now you have a way to create folders. To create another folder, you could just go back to “Item 0” under “Root” and copy it, select “Root” and paste it. Then you have two items. Expand “Item 1” and change the name from “test folder” to “test folder 2”.

Screen Shot 2017-03-13 at 10.52.41 AM.png

Open ARD and check the change.

Screen Shot 2017-03-13 at 10.53.01 AM.png


Create New Commands Inside Folders

To create a second command inside a custom folder, you would just expand the “state” field under the command name, copy “Item 0”, select “state” and paste, creating “Item 1”.

Screen Shot 2017-03-13 at 11.31.44 AM.png

Expand “Item 1”. Change the “name” field to “test command 2”. Expand “state” and select “script”. In the “value” field type or paste any command you want. For this example, I’ll type a simple command .. “ls -l”.

Screen Shot 2017-03-13 at 11.32.30 AM.png

One last check in ARD should show 2 commands in our second folder. Select “test command 2”, it populates the text field with the same command, “ls -l”, that I edited in Xcode.

Screen Shot 2017-03-13 at 11.35.13 AM.png


Wrap Up

Now you can get started organizing and editing your ARD commands. If you use ARD on multiple machines or have multiple Admins that you want to have to the same commands. Just copy the plist and drop it in the same folder on every machine.

In a future post, hopefully soon … I’ll post a ruby script that will automate this. It will handled the Dictionary and Array fields and make it easier to add commands or change existing commands.


Using Ruby To Report On Installed Adobe Creative Cloud Versions

One of the regular task of an admin is to check the version of software installed and decided if the software needs updated. This can be particular important when managing a lab of computers where having consistent application versions across all machines can be critical.

To help me report back on Adobe Creative Cloud Apps installed and their version numbers, I wrote a little script. It scans all the Applications in the /Applications folder and picks out those that start with “Adobe”, then looks for an info.plist file inside the .app bundle and reads the “CFBundleShortVersionString”.

#!/usr/bin/ruby

#==============================================================
# Loop through the applications folder and find apps that
# start with "Adobe". Look inside the folders and find
# .app files, then read the Info.plist file for the
# CFBundleShortVersionString key and report back the version
#==============================================================

#==============================================================
#get a list of Adobe apps and version numbers

def adobe_app_versions
    application_folder = Dir.entries("/Applications")
    for application_name in application_folder
        if application_name.start_with?('Adobe')
            for x in Dir["/Applications/#{application_name}/*.app"]
                puts application_name + " = " + `defaults read "#{x}/Contents/Info.plist" "CFBundleShortVersionString"`
            end
        end
    end
end

adobe_app_versions

This scripts works well for my needs, and gives me the output similar to below. I can run it via Apple Remote Desktop and compile and compare the results of an entire lab to quickly see which machines needed updated.

Adobe Acrobat DC = 15.020.20039
Adobe After Effects CC 2017 = 14.0.1
Adobe Animate CC 2017 = 16.0.1
Adobe Audition CC 2017 = 10.0.1
Adobe Bridge CC 2017 = 7.0.0.93
Adobe Character Animator CC (Beta) = 1.0.5
Adobe Dreamweaver CC 2017 = 17.0.1.9346
Adobe Experience Design CC (Beta) = 0.6.8.6
Adobe ExtendScript Toolkit CC = ESTK CC 4.0.0.1
Adobe Extension Manager CC = 7.3.2.39
Adobe Extension Manager CS6 = 6.0.8.28
Adobe Fireworks CS6 = Adobe Fireworks CS6 version 12.0.1.274
Adobe Flash Builder 4.7 = 4.7
Adobe Fuse CC (Preview) = 2015.1.0
Adobe Gaming SDK 1.4 = 1.0
Adobe Illustrator CC 2017 = 21.0.0
Adobe InCopy CC 2017 = 12.0.0.81
Adobe InDesign CC 2017 = 12.0.0.81
Adobe Lightroom = Adobe Lightroom [1083169]
Adobe Media Encoder CC 2017 = 11.0.0.131
Adobe Muse CC 2017 = 2017.0.1
Adobe Photoshop CC 2017 = 18.0.1
Adobe Prelude CC 2017 = 6.0.1
Adobe Premiere Pro CC 2017 = 11.0.1
Adobe SpeedGrade CC 2015 = 9.1.0

I will note there are a couple of issues. Apparently not every Adobe application uses the “CFBundleShortVersionString”, so you may get back an error for random applications like “After Effects Render Engine.app”, that’s inside the After Effects folder. If you have After Effects installed, you’ll get back.

The domain/default pair of (/Applications/Adobe After Effects CC 2017/Adobe After Effects Render Engine.app/Contents/Info.plist, CFBundleShortVersionString) does not exist

Also, apparently Light room doesn’t follow suit with a standard version number, so you may see something like:

Adobe Lightroom = Adobe Lightroom [1083169]

So, what we’re saying is there’s no consistency even inside Adobe Apps.

Get the script on Github

Install Printers On A Mac From The Command Line

I found myself setting up a mac from scratch this morning. It’s sort of a one off situation so applying one of my standard images didn’t seem to make sense.

Though when it came time to install the printers I realized I was going to have to add them one by one. I decommissioned our aging Mac print server a few months ago and have moved to IP based printing.

I’ve thought about using munki to manage printers and just haven’t got around to it. So I was stuck with manual setups and that thought kind of got under my skin.

So I finally made a script to add my printers all in one swoop. The basic command is below. You’ll need to wrap it in a shell script, or I just pasted the commands into Apple Remote Desktop and ran them as root on my remote machines.

Command:

/usr/sbin/lpadmin -p "name of printer" -E -v lpd://"printer IP or DNS"/"queue name" -P "path to PPD file" -D "description"

Example:

/usr/sbin/lpadmin -p "DC_3FL_PRINT_B&W" -E -v lpd://"192.168.10.99"/"DC_3FL_PRINT_B&W" -P "/Library/Printers/PPDs/Contents/Resources/HP LaserJet 9050.gz" -D "DC_3FL_PRINT_B&W"

This only works of course if you have the print drivers already installed. If they are not, you need to install them a head of time or copy them before you run this command like in the example below. I choose to copy the ppd file and not run an installer since I know exactly what ppd files I need.

The below command copies the ppd from a network share to the clients printer ppd folder. a simple “copy- source-destination”. Then sets up the desired printer.

cp /Volumes/dcfiles/Transfer\ then\ delete/nscott/PRINTERS/CNR3235X1.PPD.gz /Library/Printers/PPDs/Contents/Resources\
/usr/sbin/lpadmin -p "DC_1FL_ARC_COPY_B&W" -E -v lpd://"192.168.10.133"/"DC_1FL_ARC_COPY_B&W" -P "/Library/Printers/PPDs/Contents/Resources/CNR3235X1.PPD.gz" -D "DC_1FL_ARC_COPY_B&W"

SWITCHES
-p : configures said printer
-E : enables printer to accept jobs
-v : Sets printer URL
-P : Specifies a ppd file to use
-D : creates a text description for the printer

If you wanted to remove a printer instead of add you would just replace the first -p, used to configure a printer, with -x, used to delete a printer.