![]()
Apple Remote Desktop (ARD) has always had a cool feature to run Unix commands on client machines. If you want to save those commands you have the option to create a “Template”.
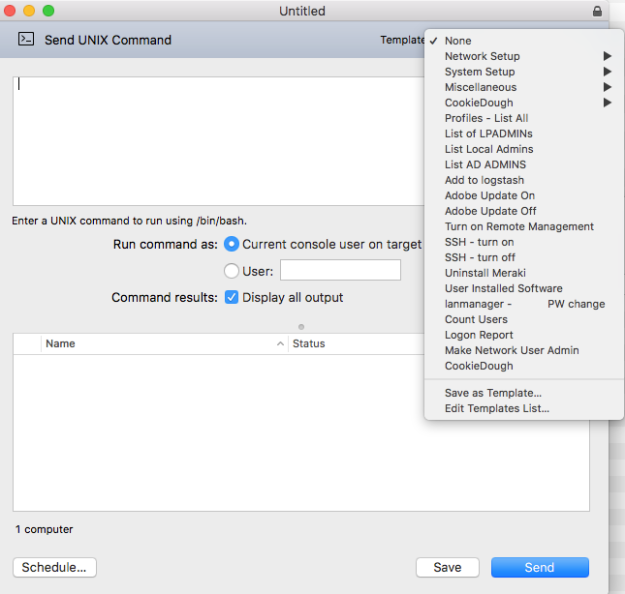
This can be a huge time saver. When you first open ARD and click on the “Unix” button, then click on the “Templates” drop down menu in the upper right. You get the out-of-box, neat and clean, defaults. Nicely organized for you.

ARD defaults
But after time .. things can get unruly. It can look like this, or worse depending on how many commands you have saved.
unorganized list of commands
It would be nice if Apple provided a built-in way to create folders and organize commands. What’s that, an update to ARD that adds features … I know … crazy talk.
But you can edit the plist manually, create your own folders, and organize as you wish. So you end up with something a bit cleaner.

organized commands with custom folders
Starting With A Clean UnixCommandTask.plist
You can find the plist that holds the commands at:
"/Users/(username)/Library/Containers/com.apple.RemoteDesktop/Data/Library/Application Support/Remote Desktop/Presets"
Assuming you have ARD installed and use it. If you don’t have that file it means you haven’t saved any commands as a template. No worries, we’ll create the file.
I’m going to start with a clean “UnixCommandTask.plist” by renaming my original, “-old”. This way I preserve my already saved commands and if something goes wrong, I have a backup.
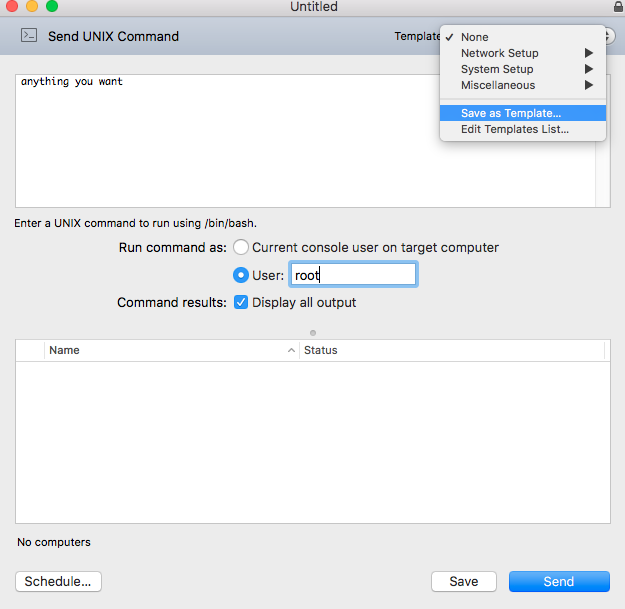
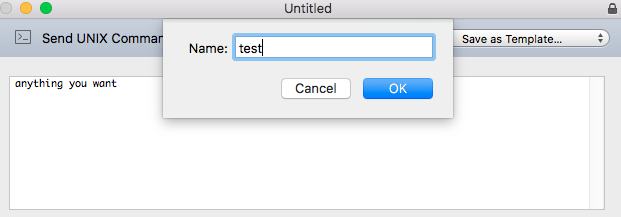
To create the plist, open ARD and click on the “Unix” command button. Type anything in the command field. Click the “User” button and add “root”, then click on “Template”. Choose “Save as Template” and when the name field pops up, type “test”.
Now you should have a new “UnixCommandTask.plist” in your “Presets” folder.
 Open it in Xcode and it should look like this:

You can do this with a text editor … it’s just XML, but because the structure is nested, it’s a bitter easier and cleaner to visualize in Xcode.
Click the triangle next to “Item 0”, which is just a dictionary, to expand and you’ll see two keys, “name” and “state”.

Next to “name” you can see it’s a “string” named … “test”. The name we gave our test command. Open “state” and you’ll see the attributes that go with the command.
outputMode = (this is the checkbox "Command Results: Display all output")
script = (the actually field you enter the command)
user = (if you run commands as root you want to make sure this is set)
userSelect = (must be set to 1, with the above user key set to root. If it's 0 it defaults to current console user)

If you don’t have all 4 fields inside state, you can click the + button to the right of state and manually create them
Creating a Folder
Now that you can see the structure, how do we create our own folder?
We make a simple change. Go back and select “Item 0” and copy it (command + c), and change the “name” key from “test” to “test folder”.

Now delete the 4 items inside the “state” key and change “state” from “Dictionary” to “Array”.

With the “state” key selected, paste (command + v) the original “Item 0” into “state”.

Expand “Item 0” and you’ll see the original structure for our test command.

Open ARD and you should now see a new folder named “test folder”, with a command named “test”.

Now you have a way to create folders. To create another folder, you could just go back to “Item 0” under “Root” and copy it, select “Root” and paste it. Then you have two items. Expand “Item 1” and change the name from “test folder” to “test folder 2”.

Open ARD and check the change.

Create New Commands Inside Folders
To create a second command inside a custom folder, you would just expand the “state” field under the command name, copy “Item 0”, select “state” and paste, creating “Item 1”.

Expand “Item 1”. Change the “name” field to “test command 2”. Expand “state” and select “script”. In the “value” field type or paste any command you want. For this example, I’ll type a simple command .. “ls -l”.

One last check in ARD should show 2 commands in our second folder. Select “test command 2”, it populates the text field with the same command, “ls -l”, that I edited in Xcode.

Wrap Up
Now you can get started organizing and editing your ARD commands. If you use ARD on multiple machines or have multiple Admins that you want to have to the same commands. Just copy the plist and drop it in the same folder on every machine.
In a future post, hopefully soon … I’ll post a ruby script that will automate this. It will handled the Dictionary and Array fields and make it easier to add commands or change existing commands.
